
The sharpness of your final image has less to do with your camera’s megapixel count and more to do with your tripod’s ability to damp micro-vibrations.
- Carbon fiber isn’t just lighter; its superior damping properties are scientifically proven to reduce vibration settling time.
- Precision adjustments for landscape and architecture are physically impossible with a standard ball head; a geared head is non-negotiable.
Recommendation: Invest in a rigid tripod system as a critical optical component, not as a simple accessory.
You’ve spent thousands on a high-resolution camera and a tack-sharp lens. You frame the perfect landscape, press the shutter, and review the image only to find it’s… soft. Not blurry, just lacking that critical, biting sharpness you paid for. The common advice is frustratingly simple: “use a tripod.” But you are using one—a flimsy, wobbly set of legs that came in a kit or cost less than your camera strap. The problem isn’t that you need *a* tripod; it’s that you’re treating it as a dumb stand for your camera, when in reality, it’s an engineered optical tool.
Most photographers focus on camera bodies and glass, overlooking the foundational element that enables them to perform. They might discuss the benefits of carbon fiber for its weight or a ball head for its speed, but they miss the core physics. The fight for sharpness isn’t won by megapixels; it’s won by defeating micro-vibrations. These imperceptible movements, caused by wind, shutter shock, or even your own touch, are the thieves of detail. They turn a masterpiece into a mediocre snapshot.
But what if the key wasn’t just having a “sturdy” tripod, but understanding it as a complete damping system? This guide abandons the generic advice. We will dissect the mechanical truths of tripod stability, from the material science of vibration absorption to the engineering trade-offs between different lock mechanisms and head types. This is the no-nonsense breakdown of why your tripod is failing you and what choices lead to unwavering, rock-solid sharpness.
This article provides a technical deep-dive into the components of a truly stable tripod system. The following sections will guide you through the critical engineering choices that directly impact the sharpness of your final images.
Contents: The Engineering of a Rock-Solid Tripod System
- Why Does Carbon Fiber Absorb Micro-Vibrations Better Than Aluminum?
- Ball Head or Geared Head: Which Is Essential for Architecture?
- Twist or Flip: Which Lock Mechanism Survives Salt Water?
- The Stability Mistake of Extending the Center Column Too Far
- When to Swap Rubber Feet for Spikes on Carpet or Grass?
- The Stability Error That Makes 70% of Telephoto Shots Soft
- The Hanging Error That Causes Large Plexiglass Prints to Bow
- How to Perform Pixel-Level Analysis Without Losing the Artistic Big Picture?
Why Does Carbon Fiber Absorb Micro-Vibrations Better Than Aluminum?
The debate between carbon fiber and aluminum tripods often revolves around a single, obvious benefit: weight. Carbon fiber is lighter, making it easier to carry. But its most critical advantage for sharpness has nothing to do with portability. It’s about its inherent damping properties. Think of aluminum as a bell; when struck, it rings, propagating vibrations. Carbon fiber, due to its layered, fibrous composite structure, acts more like a sponge, absorbing and dissipating vibrational energy instead of transmitting it.
These micro-vibrations are the primary enemy of sharpness, especially during long exposures or when using telephoto lenses. A gust of wind, the slap of a DSLR mirror, or even slight ground tremors will cause an aluminum tripod to resonate, blurring fine details at a microscopic level. A carbon fiber tripod kills these vibrations almost instantly. In fact, recent testing data shows an 81% faster vibration settling time for carbon fiber compared to aluminum. This isn’t a marginal improvement; it’s a fundamental shift in performance.
Real-world tests conducted by photographers confirm this. In simple “tap tests” where a tripod leg is tapped while a telephoto lens is mounted, aluminum legs can take 6-8 seconds for vibrations to fully cease. A quality carbon fiber tripod under the same conditions settles in just 2-3 seconds. This dramatic difference in damping capability is the scientific reason why professionals invest in carbon fiber. It’s not a luxury; it’s a non-negotiable tool for maximizing the resolving power of your lens and sensor.
Ball Head or Geared Head: Which Is Essential for Architecture?
For genres like landscape and, most critically, architectural photography, composition is about precision. Lines must be perfectly vertical and horizontal. A few millimeters of adjustment can make or break an image. This is where the ubiquitous ball head, prized for its speed, becomes a liability. A ball head is designed for rapid, fluid repositioning. But achieving a precise, locked-off composition is a fight against gravity and friction. You loosen, adjust, and as you tighten, the heavy camera and lens combination inevitably “sags” or “creeps,” ruining your alignment.
As architectural photographer Jak Spedding notes in his professional guide, this is a fundamental flaw:
Making minor adjustments with a ball head is almost impossible, even with friction control you’re always going to be fighting against the weight of the camera and some resulting sag when you let go.
– Jak Spedding, Architectural Photography Guide
The solution is a geared tripod head. Instead of a single-tension ball, a geared head uses separate, worm-gear-driven knobs for each axis of movement (pan, tilt, and side-to-side). Each turn of a knob results in a tiny, precise, and non-reversing adjustment. There is zero sag. It allows you to dial in a composition with millimeter-level accuracy, which is essential for aligning architectural perspectives or creating stitched panoramas. The process is slower, but the result is perfect, repeatable control.
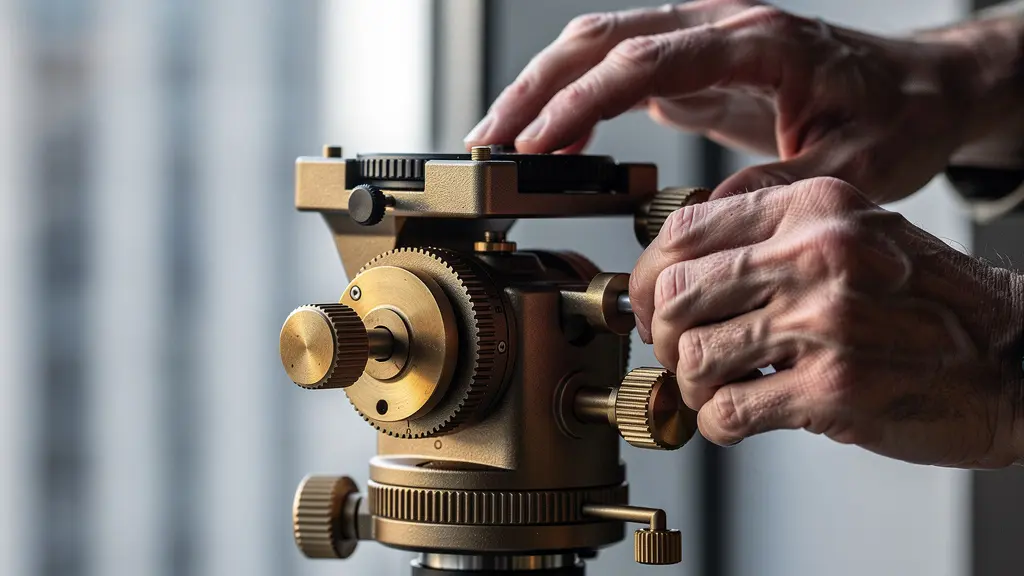
This comparison table makes the trade-offs clear. As an analysis of head types for architecture shows, the choice depends entirely on your need for precision over speed.
| Feature | Ball Head | Geared Head |
|---|---|---|
| Setup Speed | Fast (seconds) | Slow (minutes) |
| Precision Control | Limited | Micro-adjustments possible |
| Weight | Light (300-500g) | Heavy (1-2kg) |
| Lens Creep | Common with heavy lenses | Eliminated by worm-gear |
| Best For | Quick composition changes | Precise architectural alignment |
Twist or Flip: Which Lock Mechanism Survives Salt Water?
For landscape photographers, especially those working in coastal environments, the leg lock mechanism is a critical point of failure. The two dominant designs are flip-locks (levers) and twist-locks. Flip-locks offer speed and visual confirmation—if the lever is closed, it’s locked. However, their external mechanism with pins and levers is a magnet for sand, grit, and salt. Once contaminated, they become difficult to close, fail to lock securely, and are nearly impossible to clean in the field without tools.
Twist-locks, on the other hand, have a sealed internal design. This makes them far more resistant to environmental contamination. When you immerse your tripod in saltwater or set it down on a sandy beach, less debris can penetrate the locking mechanism. Furthermore, they are designed for easy field maintenance. Most twist-locks can be completely disassembled by hand, without any tools. You can simply unscrew the collar, rinse the internal shims and threading with fresh water, let them dry, and reassemble. This is impossible with most flip-lock designs.
This ease of maintenance is paramount for longevity and reliability. Saltwater is incredibly corrosive, and trapped grit can grind away at the leg sections. A tripod with a seized or failing lock is not just an inconvenience; it’s a danger to your equipment. Because of their enclosed mechanics and carbon fiber’s inherent material properties which present zero galvanic corrosion risk, twist-lock systems offer superior durability in harsh conditions.
Field Maintenance Protocol for Coastal Photography
- Rinse tripod legs with fresh water immediately after saltwater exposure
- Disassemble twist locks completely for thorough cleaning
- Apply silicone lubricant to threading mechanisms
- Test each lock mechanism for smooth operation before next use
- Store with legs slightly extended to prevent seal compression
The Stability Mistake of Extending the Center Column Too Far
The center column is often seen as a convenient way to gain a few extra inches of height. It is, without question, the single greatest source of instability in any tripod system. A tripod’s stability comes from its wide, triangular base. By raising the center column, you are mounting your multi-thousand-dollar camera setup on a narrow, unsupported monopod that sits atop that stable base. You effectively negate the entire purpose of the tripod legs.
This introduces a massive amount of flex and vibration into the system. Even a slight breeze will cause a raised center column to oscillate, completely destroying any chance of critical sharpness. The higher you extend it, the more pronounced the effect becomes. In fact, engineering tests demonstrate that a fully extended center column can lead to up to 40% stability loss. This means a tripod rated to hold 20kg might only be stable enough for 12kg with its column up.
Professional workflow dictates a strict hierarchy for achieving height. You should always extend the thickest, uppermost leg sections first, as they offer the most rigidity. Only when all leg sections are fully extended should you even consider raising the center column, and only by the absolute minimum amount necessary. A better approach is to treat the center column as a feature that should almost never be used. If you need more height, you need a taller tripod. Shooting with an extended center column, especially in wind or near moving water, is a guarantee of soft images.
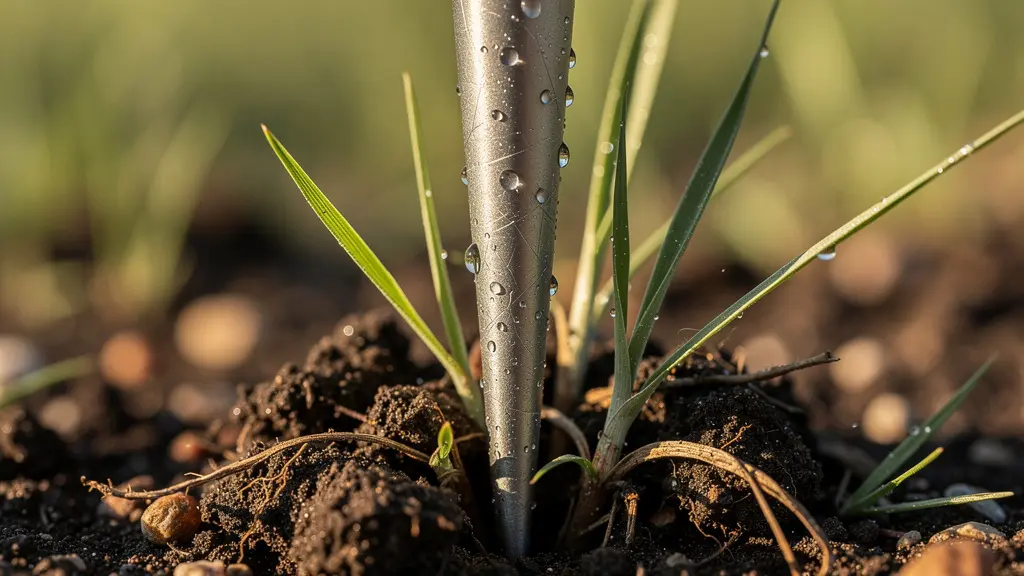
When to Swap Rubber Feet for Spikes on Carpet or Grass?
The point of contact between your tripod and the ground is the final, critical link in the stability chain. Most tripods come with standard rubber feet, which are excellent for hard, flat surfaces like concrete, rock, or wood floors. The rubber acts as a damper, absorbing high-frequency vibrations and preventing the tripod from slipping. However, on soft or uneven surfaces, rubber feet are a liability. On grass, soil, sand, or even thick carpet, rubber feet simply rest on top of an unstable surface, allowing the entire system to shift and settle.
This is where interchangeable feet, specifically metal spikes, become essential. The purpose of spikes is not to “grip” but to achieve mechanical coupling. By driving the spikes through the soft top layer (grass, loose soil), you are physically connecting the tripod to the stable, solid earth beneath. The tripod and the ground become a single, rigid unit, providing the ultimate foundation for sharpness. This is the same principle used in the foundations of buildings.
Spikes couple the tripod to the earth, making it an extension of the solid ground—ideal for landscape. Rubber feet damp and isolate from surface vibrations—ideal for a bouncy wooden floor.
– Troy Miller, Professional Night Photography Guide
Choosing the right foot for the surface is not a minor detail; it’s a fundamental technique for building a stable platform. Using the wrong feet is like building a house on a foundation of sand. The following table provides a clear guide for foot selection based on the terrain you’re working on.
| Surface | Recommended Feet | Reason |
|---|---|---|
| Grass/Soil | Spikes | Couples to earth for stability |
| Sand/Snow | Wide baskets | Prevents sinking |
| Wood floors | Rubber | Dampens vibrations |
| Historic floors | Rubber only | Prevents damage |
| Flat rocks | Rubber | Better grip, spikes slip |
The Stability Error That Makes 70% of Telephoto Shots Soft
Mounting a heavy telephoto lens to a tripod introduces enormous torque and leverage. The most common and damaging mistake photographers make is mounting the setup via the camera body’s tripod socket. This leaves the long, heavy lens hanging off the front, unsupported. The entire weight of the lens pulls downward, putting immense strain on the lens mount and creating a cantilever effect. The system becomes incredibly front-heavy and prone to vibration, especially from wind or shutter shock.
This improper mounting technique is a primary cause of soft images with long lenses. According to biomechanical analysis, professional testing reveals that mounting a heavy telephoto lens by the camera body can introduce 3x more strain on the lens mount compared to correct methods. This not only increases vibration but also risks long-term damage to the delicate connection between your lens and camera.
The correct method is non-negotiable: always use the tripod collar foot that comes with the lens. This collar attaches around the barrel of the lens, moving the point of support directly under its center of gravity. This balances the entire rig, eliminates strain on the lens mount, and dramatically improves system rigidity. A proper telephoto workflow involves several key steps:
- Always mount the lens using its dedicated tripod collar, never the camera body.
- Use a long Arca-Swiss plate to slide the rig forward or backward, perfectly balancing the center of gravity over the tripod’s apex.
- In windy conditions, hang a weight (2-3kg) from the center column hook to lower the center of gravity and increase stability.
- Use a gimbal or high-quality fluid head with adjustable friction to allow for smooth tracking without compromising stability.
- Use your body or a dedicated cover to shield the large lens hood from crosswinds, which act like a sail.
The Hanging Error That Causes Large Plexiglass Prints to Bow
The pursuit of sharpness does not end at the moment of capture. It extends all the way to the final presentation. You can have a technically perfect, bitingly sharp file, born from a rock-solid tripod and flawless technique, only to see it ruined by an improper display method. For large format prints, especially modern face-mounts to acrylic or Plexiglass, the mounting system is the final component of the “sharpness system.”
A common mistake with large prints is using a simple, inadequate hanging system like a wire or a single cleat. Over time, gravity and subtle changes in temperature and humidity will cause a large, heavy acrylic print to bow or warp. This bowing distorts the flat plane of the image, causing distracting reflections and a perceived loss of sharpness. The perfectly straight lines you worked so hard to capture with your geared head will now appear curved and distorted.
To preserve the integrity of a sharp, large-format print, a rigid backing and mounting frame is essential. Professional galleries and print labs have found that an aluminum subframe or “inset frame” bonded to the back of the print is the only reliable solution. This metal frame provides the necessary structural rigidity to keep the print perfectly flat over its entire surface, preventing bowing and warping for decades. It is the final link in the chain of stability.
An exceptionally sharp image, born from a rigid tripod, reveals every flaw in the final print. The choice of a rigid display method like a face-mount with a subframe isn’t optional; it’s the final step in preserving sharpness.
– Professional Print Lab, Fine Art Printing Standards
Key Takeaways
- A tripod is not an accessory; it is a critical optical component whose primary job is to damp micro-vibrations.
- Vibration damping (carbon fiber) is more important for sharpness than weight savings, and precision mechanics (geared head, spikes) are more important than speed.
- System rigidity is an end-to-end process, from the feet on the ground to the subframe on the back of your final print.
How to Perform Pixel-Level Analysis Without Losing the Artistic Big Picture?
After investing in a rigid tripod system and meticulous technique, the final step is to critically evaluate your results. However, many photographers fall into the trap of “pixel-peeping” without purpose. They zoom to 100% or 200% and pan around the image aimlessly, losing all sense of the overall composition and emotional impact. A truly sharp image must serve the artistic vision, not just be a technical exercise. A structured evaluation workflow is necessary to balance technical analysis with artistic judgment.
This process, often called a “three-read workflow,” allows you to assess the image on different levels without getting lost in the details. It ensures that your technical achievements in sharpness are actually enhancing the final photograph. While web images can be forgiving, remember that output standards research shows that 30-inch prints require 3x the sharpness of web images to be perceived as crisp from a normal viewing distance, making this analysis critical for print work.
A disciplined workflow separates the technical from the artistic, ensuring both are served:
- The Technical Read: Zoom to 100-200% and go directly to your critical focus points—the eyes in a portrait, the foreground element in a landscape. Is the sharpness there? Check for motion blur or signs of vibration. This is a pass/fail test of your field technique.
- The Compositional Read: Zoom out to “fit-to-screen” view. Forget the pixels. Analyze the image’s structure. How do the lines flow? Is the composition balanced? Does the sharpest point in the image draw the eye where you intended?
- The Emotional Read: View the image as a small thumbnail, or as part of a grid with other images. What is your immediate gut reaction? Does it have impact? Does it convey the mood you were aiming for? At this size, only color, light, and strong composition matter.
This structured analysis allows you to confirm your technical success without losing sight of the only thing that truly matters: creating a powerful image. It is the final quality check in a system dedicated to absolute sharpness.
By understanding that a tripod is not a stand but a system, and that every component choice has a direct impact on vibration, you can finally unlock the full potential of your camera and lenses. Stop accepting soft images and start building your foundation on solid engineering.