Equipment & Techniques
Photography stands at the crossroads of art and science, where creative vision meets technical precision. Every compelling photograph begins with a photographer who understands not just what to capture, but how the equipment and techniques interact to translate that vision into reality. Whether you’re holding your first serious camera or refining your craft after years of shooting, mastering the relationship between gear and technique transforms your ability to create meaningful images.
This comprehensive exploration examines the essential equipment categories and core technical skills that define modern fine art photography. From the physics of light capture to the chemistry of archival printing, from the geometry of composition to the artistry of post-processing, we’ll connect the fundamental concepts that elevate photography from simple documentation to expressive art. Understanding these foundations empowers you to make informed choices about your gear, approach each shoot with confidence, and consistently produce images that match your creative intent.
Essential Camera Equipment: Building Your Technical Foundation
At the heart of every photograph lies the camera body and lens—the primary tools that determine image quality potential. Modern digital cameras function as sophisticated light-measuring instruments, with sensors that translate photons into digital information through millions of photodiodes. Understanding how these components work together allows you to exploit their strengths and work around their limitations.
Sensor Technology and Image Capture Science
The camera sensor represents your digital film plane, where light becomes data. Larger sensors typically offer superior dynamic range—the ability to capture detail in both bright highlights and deep shadows simultaneously. This latitude proves invaluable when photographing high-contrast scenes like sunlit landscapes or theatrical performances. The sensor’s bit depth, commonly 12-bit or 14-bit in quality cameras, determines how many tonal gradations it can record between pure black and pure white, directly impacting your post-processing flexibility.
Sensor coatings and microlens arrays maximize light-gathering efficiency, while the absence of an optical low-pass filter (in many contemporary bodies) enhances resolution at the cost of potential moiré patterns in certain situations. Understanding concepts like the circle of confusion—the maximum blur spot that appears acceptably sharp—helps you evaluate how sensor size affects depth of field and diffraction limits at small apertures.
Lens Selection and Optical Quality
Lenses shape how you see and interpret the world. Beyond simple magnification, each focal length carries distinct aesthetic properties. Wide-angle lenses emphasize spatial relationships and exaggerate perspective, making them ideal for architectural photography and environmental portraits. Standard focal lengths (approximating human vision) render scenes naturally, while telephoto lenses compress distance and isolate subjects through shallow depth of field.
Optical quality matters profoundly for fine art work. Premium lenses minimize chromatic aberration (color fringing), control distortion, and deliver exceptional sharpness across the frame. The “zoom with feet” philosophy—moving closer or farther rather than changing focal length—encourages more deliberate composition and often yields superior optical performance compared to zoom lenses at equivalent focal lengths.
Mastering Light: The Photographer’s Primary Medium
Light defines photography—the word itself means “writing with light.” Whether you’re working with the soft luminosity of an overcast sky or sculpting dramatic shadows with studio strobes, understanding light’s behavior and characteristics separates competent technical execution from truly expressive imagery.
Natural Light and Its Qualities
Natural light constantly changes in color temperature, intensity, and direction. The golden hour—the period shortly after sunrise or before sunset—offers warm, directional light that wraps subjects in flattering illumination. Understanding how to time your shoots for specific light qualities, or how to modify harsh midday sun with reflectors and diffusion, expands your creative possibilities dramatically.
The angle of incidence—how light strikes your subject relative to the camera position—determines texture revelation and dimensional modeling. Side lighting emphasizes surface texture and creates volume through shadow gradation, while front lighting minimizes texture but ensures even exposure. Learning to read and predict natural light patterns allows you to pre-visualize how scenes will photograph throughout the day.
Studio Lighting and Artificial Control
Studio lighting grants complete creative control over every aspect of illumination. The fundamental principle of light modification centers on source size relative to subject distance: larger sources (or sources closer to subjects) produce softer, more gradual shadow transitions, while smaller or distant sources create harder, more defined shadows.
Professional photographers employ various modifiers to shape light character:
- Softboxes and umbrellas enlarge and diffuse the source for flattering portraits
- Grids and snoots focus light into controlled beams for accent lighting
- Reflectors and fill cards bounce light to control contrast ratios
- Flags and gobos subtract light to create negative fill and deeper shadows
The contrast ratio between key and fill light defines mood. High-key lighting (low contrast, bright tonality) conveys optimism and airiness, while low-key lighting (high contrast, predominantly dark tones) suggests drama and mystery. Measuring light with a handheld meter allows precise control over these ratios, ensuring consistent results across a series.
Mixing Light Sources
Combining natural and artificial light—often called “dragging the shutter”—balances ambient exposure with flash illumination. This technique allows you to expose correctly for window light while adding fill flash to control shadows, or to capture both a twilight sky and a properly lit subject. Matching color temperatures between sources prevents unwanted color casts, though intentional temperature mismatches can create striking stylistic effects.
Exposure, Color and Dynamic Range Control
Exposure represents the fundamental technical decision in photography: how much light reaches the sensor, and how that light translates into tonal values. Modern digital photography offers unprecedented control over this process, both at capture and in post-processing.
Exposure Strategy and Sensor Latitude
The technique of exposing to the right (ETTR) maximizes image quality by placing the histogram as far right as possible without clipping highlights. Because sensors capture far more tonal information in highlights than shadows, this approach minimizes noise in darker areas when you bring exposure down during processing. Understanding your specific camera’s sensor capabilities—its highlight rolloff characteristics and shadow noise performance—allows you to push this technique appropriately.
When a scene’s brightness range exceeds your sensor’s dynamic range, exposure blending techniques come into play. You might capture multiple exposures at different settings and manually blend them in post-processing, preserving detail throughout the tonal range while maintaining a natural appearance.
The Zone System in Digital Photography
Ansel Adams’ zone system, originally developed for film, translates elegantly to digital capture. By visualizing a scene as eleven zones from pure black to pure white, you learn to pre-visualize how tonalities will render and where to place your exposure to achieve the desired result. Middle gray (Zone V) serves as the reference point, with each zone representing one stop of exposure difference.
Understanding mid-tone placement proves crucial because it affects the entire tonal distribution of your image. Slight adjustments to where you place middle gray during processing dramatically alter mood and emphasis, making this knowledge essential for expressive photography.
Color Management and Workflow Fidelity
Accurate color requires a calibrated workflow from capture through output. This process involves:
- Creating custom camera profiles that accurately characterize how your sensor records color under specific lighting
- Calibrating your display to industry standards, ensuring what you see matches reality
- Working in appropriate color spaces (typically ProPhoto RGB or Adobe RGB for processing, sRGB for web output)
- Viewing prints under standardized lighting (typically 5000K daylight-balanced sources)
Preventing double-profiling—accidentally applying color management twice—requires understanding how different applications handle color data. Shooting in RAW format provides maximum flexibility for color correction, as white balance becomes a non-destructive processing decision rather than a capture commitment.
Optical Techniques: Focus, Depth and Perspective
Where you place sharpness, how much of your frame appears in focus, and how perspective renders spatial relationships—these decisions fundamentally shape how viewers interpret your images.
Depth of Field Mastery
Depth of field describes the zone of acceptable sharpness extending in front of and behind your focus point. Three factors control it: aperture size, focal length, and focus distance. Wider apertures (smaller f-numbers) reduce depth of field, longer focal lengths compress it, and closer focus distances minimize it. Understanding these relationships allows you to precisely control which elements appear sharp and which dissolve into background blur.
The hyperfocal distance represents the focus point that maximizes depth of field from half that distance to infinity. Landscape photographers frequently employ this calculation to ensure sharpness from foreground elements through distant horizons. Conversely, portrait photographers often work at wider apertures to isolate subjects against softly rendered backgrounds, directing viewer attention through selective focus.
Advanced Focus Control Techniques
When even the smallest apertures cannot provide sufficient depth of field—common in macro and product photography—focus stacking offers a solution. This technique involves capturing multiple images focused at different distances, then blending only the sharp regions of each frame. The result shows impossible depth, with every detail rendered crisply throughout three-dimensional space.
Tilt-shift lenses provide another approach by tilting the focal plane relative to the sensor. Following the Scheimpflug principle, this allows you to align the plane of focus with a receding surface, keeping architectural elements sharp from near to far, or conversely, creating selective blur effects for creative emphasis.
Perspective and Composition Control
Perspective—how three-dimensional space projects onto a two-dimensional frame—depends entirely on camera position, not focal length. Moving closer to subjects enlarges foreground elements relative to background ones, while distance compresses spatial relationships. This understanding proves crucial for architectural photography, where shift movements correct converging verticals without perspective distortion.
Compositional techniques leverage natural frames, leading lines, and geometric relationships to guide viewer attention. The deliberate use of symmetry versus dynamic asymmetry, the selection of crop ratios, and the positioning of subjects within the frame all contribute to visual impact beyond simple technical sharpness.
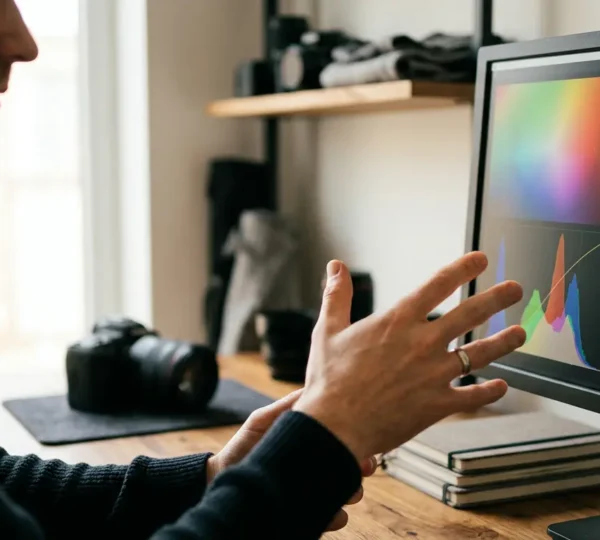
Post-Processing: From Capture to Vision
Modern photography separates capture from interpretation. Post-processing represents where your technical knowledge and artistic vision combine to refine raw sensor data into a finished image that matches your creative intent.
RAW Processing Fundamentals
RAW files contain unprocessed sensor data—digital negatives requiring development. This format preserves maximum bit depth and tonal information, allowing non-destructive adjustments to exposure, white balance, and color interpretation. Unlike JPEGs, which bake these decisions into the file at capture, RAW files let you refine these fundamental parameters with minimal quality loss.
Understanding compression types matters: lossless compressed RAW maintains all data while reducing file size, while lossy compression (though rarely used for RAW) discards information. Optimizing your archival format ensures your work remains accessible and editable indefinitely.
Essential Processing Techniques
Classical darkroom techniques translate directly to digital processing. Dodging (lightening) and burning (darkening) specific areas allows you to direct attention and balance tonality beyond what the camera captured. Unlike crude global adjustments, selective dodging and burning respects the natural light in your scene while emphasizing important elements and de-emphasizing distractions.
Split toning—applying different color casts to highlights and shadows—creates mood and stylistic cohesion. Subtle warm tones in highlights combined with cool shadows often evoke nostalgia, while inverted relationships create surreal or contemporary effects. The key lies in restraint; effective split toning often operates at the threshold of perception.
High-End Retouching Standards
Fine art photography demands meticulous technical cleanup. Removing sensor dust spots, correcting optical aberrations, and addressing minor technical flaws allows your subject and composition to speak without distraction. Proper sharpening techniques vary by output size—what works for screen display differs from large-format prints.
Sequencing your workflow prevents quality degradation. A typical order progresses from global corrections (lens corrections, white balance, exposure) through selective adjustments (dodging, burning, color grading) to final output preparation (sharpening, sizing, format conversion). This non-destructive approach, typically managed through layer stacks and masking methods, preserves maximum editing flexibility.
Printing and Archival Presentation
The print represents photography’s ultimate realization—a physical object that exists independent of screens and power sources. Understanding the technical requirements of professional output ensures your images translate effectively from pixels to paper.
Substrate Selection and Longevity
Archival printing substrates vary in texture, weight, optical brightening agents, and chemical composition. Matching paper texture to image style affects the final appearance: smooth glossy papers maximize detail and color saturation for technical subjects, while textured matte papers suit softer, atmospheric imagery. The presence of optical brightening agents (OBAs) creates brilliance in new prints but may shift color temperature as they degrade under UV exposure over time.
The chemistry of longevity involves both paper and ink. Acid-free cotton rag papers resist degradation, while pigment-based inks outlast dye-based alternatives by decades. Professional printing workflows account for these factors when archival permanence matters.
Output Workflow and Calibration
Successful printing requires several technical steps:
- Calibrating the viewing environment to standardized lighting conditions
- Creating custom print profiles that describe how specific ink and paper combinations render color
- Soft-proofing on your calibrated monitor to preview how colors will translate to print
- Sharpening appropriately for final output size and viewing distance
Border ratios, mounting choices, and final assembly all contribute to presentation impact. These decisions represent the final creative choices in your photographic process, transforming digital files into physical artifacts that can be exhibited, collected, and preserved for generations.
Mastering photography’s equipment and techniques creates a foundation for consistent creative expression. While artistic vision guides what you photograph and why, technical knowledge determines whether you can successfully execute that vision. These skills work together, each reinforcing the other, allowing you to approach any photographic challenge with both confidence and creative freedom.
How to Maximize the Hidden Data in Your RAW Files?
A RAW file is not a photograph; it is a dormant dataset of pure sensor information, and treating it as such fundamentally changes the post-processing workflow. Understanding the bit depth…
Read more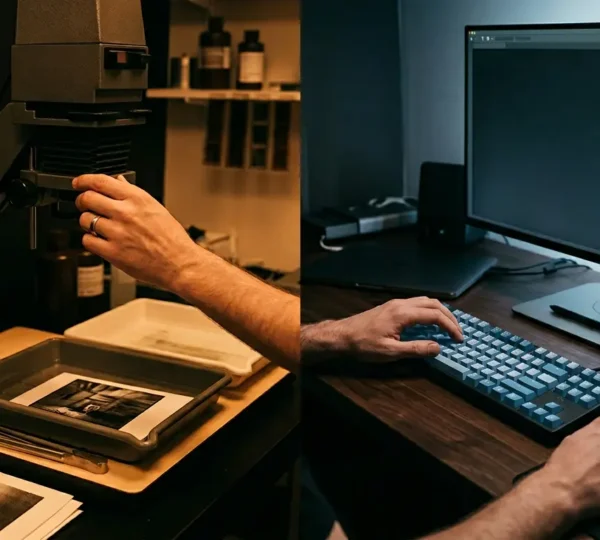
How to Apply Traditional Darkroom Artistry in the Digital Age?
Recreating the soul of film in digital files isn’t about using presets; it’s about adopting the intentionality of a master printer. True artistry comes from consciously sculpting light and tone,…
Read more
Print-to-Screen Fidelity: A Standardized Workflow for Perfect Color Every Time
The frustrating gap between your screen and your print is not due to a single mistake, but a breakdown in the color management chain. Monitor calibration, color space selection, driver…
Read more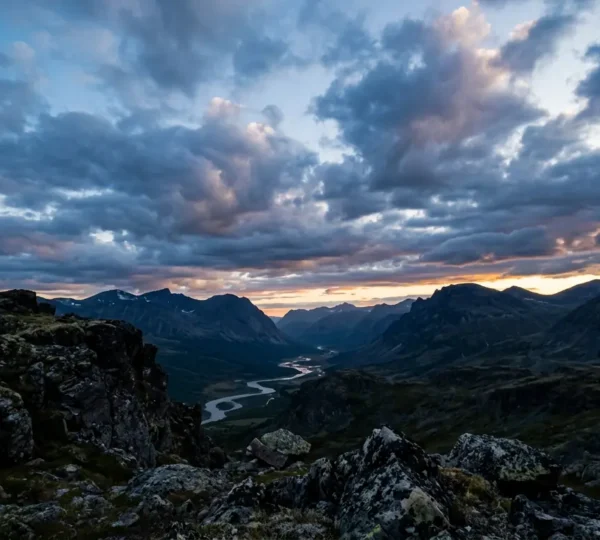
How to Capture High Dynamic Range Scenes Without the “Fake HDR” Look?
The secret to natural-looking high-dynamic-range images is not found in post-processing tricks, but in a pre-emptive capture strategy that prioritizes data integrity over everything else. Exposing To The Right (ETTR)…
Read more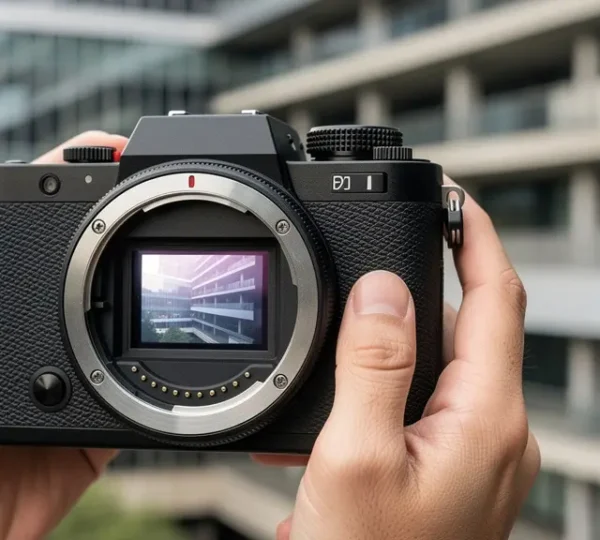
Why Do Medium-Format Sensors Create a “Look” That Full Frame Cannot?
The coveted ‘medium-format look’ is not an intangible magic, but the direct result of superior data acquisition and optical physics. Larger sensors necessitate longer focal lengths for equivalent views, creating…
Read moreHow to Perform Pixel-Level Analysis Without Losing the Artistic Big Picture?
Mastering high-end retouching means shifting focus from chasing every pixel flaw to making deliberate, output-aware choices that serve the final artistic impression. Effective retouching employs a triage system for imperfections,…
Read more
Why a Rigid Tripod Is the Single Most Underrated Tool for Absolute Sharpness
The sharpness of your final image has less to do with your camera’s megapixel count and more to do with your tripod’s ability to damp micro-vibrations. Carbon fiber isn’t just…
Read more
How to Master Depth of Field for Large Format Fine Art Prints
Contrary to popular belief, achieving sharpness in massive prints is not about smaller apertures, but about mastering the physics of how sharpness scales. The perceived sharpness of an image fundamentally…
Read more
How to Use Long Focal Lengths to Isolate Details in Chaos
In summary: Stop seeing three-dimensional scenes; learn to perceive a two-dimensional “graphic canvas” ripe for isolation. Mastering a telephoto lens is an act of “visual subtraction”—intentionally removing elements to reveal…
Read more
Why Shooting with Prime Lenses Improves Your Compositional Discipline
Switching to prime lenses is the single most effective way to cure compositional laziness and develop true photographic intent. They force you to “pre-visualize” the shot by imposing a fixed…
Read more