The secret to turning flat landscape photos into deep, atmospheric masterpieces isn’t just finding haze, but understanding how to sculpt it with light and technique.
- Backlighting is the most critical element; it makes atmospheric particles glow, creating visible layers and separating your subject from the background.
- Timing is paramount. The specific qualities of blue hour haze and the fleeting moments when fog lifts offer unique opportunities for mood and drama.
- Proper exposure (exposing to the right) is non-negotiable to avoid turning delicate haze into a flat, noisy grey mush during post-processing.
Recommendation: Instead of avoiding hazy days, seek them out. Plan your shoots around weather that produces fog and haze, and focus your practice on controlling light direction to transform the atmosphere from a problem into your greatest compositional tool.
Every landscape photographer knows the feeling. You stand before a breathtaking vista, a scene layered with distant mountains and rolling hills, and you press the shutter. But back on your screen, the magic is gone. The depth has vanished, replaced by a flat, two-dimensional rendering that feels lifeless. You’ve captured the place, but not the feeling. The common advice is to wait for clear, sunny days, but this is a profound misunderstanding of what creates depth in an image.
Many guides will tell you to shoot during the golden hour or use a telephoto lens to compress the scene. While sound advice, these are just small pieces of a much larger puzzle. They are the ‘what’ without the ‘why’. They don’t address the fundamental reason your images lack three-dimensionality: a failure to harness the atmosphere itself. Haze, fog, and mist are not obstacles to be overcome; they are the very medium you can use to sculpt depth and evoke powerful emotions.
This is where the landscape master separates from the hobbyist. The real journey begins when you stop seeing haze as a flaw and start treating it as a canvas. The key isn’t simply in finding atmosphere, but in understanding the physics of light, the subtle cues of the weather, and the precise camera techniques required to control it. It’s about learning to see the air itself as a subject.
This guide will walk you through the art and science of atmospheric haze. We will explore how to predict it, how to expose for it, and most importantly, how to use light to transform it from a flat veil into a dynamic element that gives your images palpable depth and an unforgettable mood.
To navigate this deep dive into atmospheric photography, we’ve structured this guide to build your skills progressively. You will learn the secrets of different times of day, the technical pitfalls to avoid, and the artistic choices that elevate a snapshot into a masterpiece.
Summary: A Photographer’s Guide to Sculpting with Atmosphere
- Why Is Blue Hour the Best Time for capturing Natural Haze?
- How to Predict Fog Conditions for Moody Forest Photography?
- Haze Spray vs. Nature: Can You Fake Atmosphere in Studio Landscapes?
- The Exposure Error That Turns Hazy Scenes into Grey Mush
- When to Start Shooting as the Fog Lifts for Dramatic Beams?
- Why Does Heat Haze Ruin Your 400mm Landscape Shots?
- Why Does Backlighting Create Immediate Separation from the Background?
- How to Choose the Right Diffusion Filter for Cinematic Halation?
Why Is Blue Hour the Best Time for capturing Natural Haze?
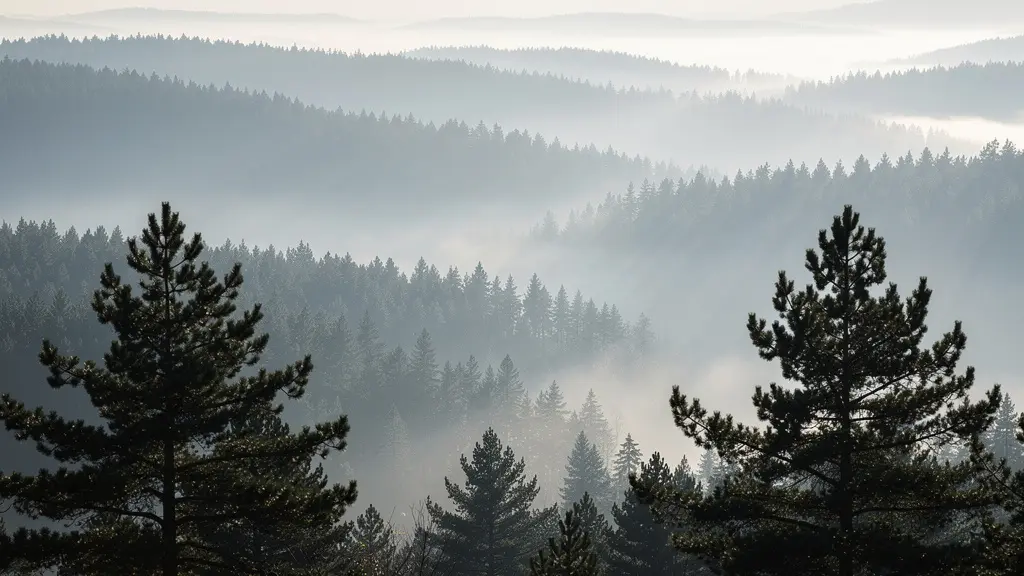
While golden hour gets all the glory, the patient photographer knows that true atmospheric magic often happens during the blue hour. This is the period shortly before sunrise or after sunset when the sun is just below the horizon. The light is not direct, but scattered, and this scattering is what makes all the difference for haze. The phenomenon, known as Rayleigh scattering, affects shorter, blue wavelengths of light more than longer, red ones. This is why the sky is blue, and it’s also why haze and fog take on a deep, ethereal blue tint during this time.
This cool, monochromatic palette is a gift for creating depth. The blue tones naturally recede in our perception, making distant elements feel farther away. This creates a powerful effect of tonal perspective, where layers of the landscape separate not just by focus, but by color and luminosity. A foreground tree might appear as a dark silhouette, a midground hill a medium blue, and a distant mountain range a faint, pale blue. This is something golden hour’s warm, uniform light struggles to achieve.
To capture this, your technique must be precise. The low light requires a wider aperture (like f/2.8 to f/4) and a slightly higher ISO (400-800) to gather enough light without introducing too much noise. Crucially, setting your white balance manually to a ‘Tungsten’ preset or around 3200K will accentuate the cool tones, preventing your camera’s auto white balance from trying to “correct” the beautiful blues back to a neutral grey. Shooting in RAW is non-negotiable, as it preserves the maximum tonal information in the delicate gradations of the haze, giving you full control in post-processing.
Ultimately, the blue hour offers a quieter, more contemplative mood than its fiery counterpart. It’s the perfect time to capture the subtle, layered beauty of a hazy landscape, transforming a simple scene into a piece of evocative art.
How to Predict Fog Conditions for Moody Forest Photography?
Walking into a forest and stumbling upon a blanket of fog is a matter of luck. Intentionally capturing moody, fog-laden forest scenes, however, is a matter of science and preparation. Fog is the ultimate tool for simplifying a chaotic woodland environment, isolating subjects, and creating an instant sense of mystery and mood. As professional landscape photographer Mads Peter Iversen notes, fog is the most obvious and effective atmospheric condition for this purpose. To predict it, you must become a student of micro-weather.
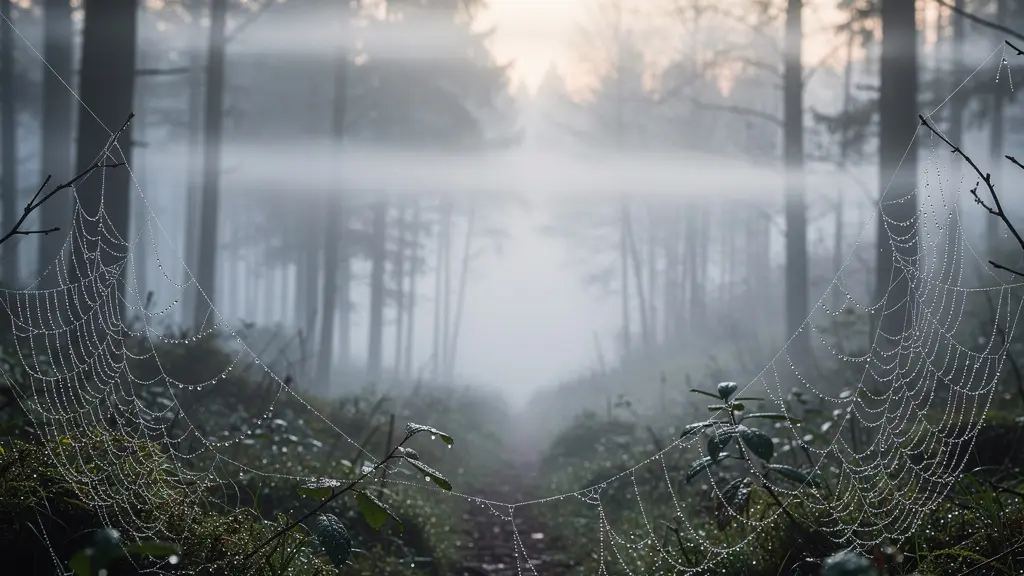
As this scene visualizes, fog formation is a delicate dance of temperature and humidity. There are several types, but two are key for photographers: radiation fog and valley fog. Radiation fog forms on clear, calm nights when the ground cools rapidly, chilling the moist air just above it to its dew point. It’s often found in open fields and meadows near a forest at dawn. Valley fog is a landscape photographer’s dream; it forms when cold, dense air sinks into valleys and gets trapped, often lasting for hours after sunrise. To find it, you need to look for valleys and hollows after a night with a significant temperature drop.
Mads Peter Iversen’s Atmospheric Photography Approach
Professional landscape photographer Mads Peter Iversen emphasizes that fog is the most obvious atmospheric condition for creating mood in landscapes. He notes that fog works exceptionally well for isolating subjects and has a simplifying presence that transforms ordinary scenes. Through his analysis of atmospheric conditions, Iversen has developed techniques for predicting and capturing fog, particularly focusing on temperature differentials and humidity levels that create ideal conditions for both radiation and valley fog formations.
Understanding these different types of fog is crucial for being in the right place at the right time. Each has a distinct visual character and forms under specific conditions.
| Fog Type | Formation Conditions | Visual Character | Best Locations |
|---|---|---|---|
| Radiation Fog | Clear nights, cooling ground | Ground-level, wispy | Open fields, meadows |
| Advection Fog | Warm air over cool surfaces | Dense, rolling | Coastal areas, lakeshores |
| Valley Fog | Cool air trapped by terrain | Thick, persistent layers | Mountain valleys, hollows |
| Upslope Fog | Moist air rising up slopes | Gradual density increase | Mountain sides, hillsides |
Your Action Plan: Auditing a Scene for Fog Potential
- Weather Check: Look for a 10-15°F (5-8°C) temperature drop overnight with humidity above 90% and low wind speeds (under 5 mph).
- Location Scout: Identify low-lying areas, valleys, or bodies of water on a map. These are natural fog traps.
- Timing is Everything: Plan to be on location 45-60 minutes before sunrise. Radiation fog is often thickest just before the sun appears.
- Observe the Signs: Look for dew on grass and spiderwebs. This is a clear indicator that the air is at or near its saturation point.
- Plan Your Shot: Before the fog fully forms, establish your composition. Once it rolls in, visibility will drop, and finding a strong composition will be difficult.
Once you’re in the fog, focus manually on a high-contrast edge, like the trunk of a nearby tree. Autofocus will hunt endlessly in the low-contrast environment. With preparation and a bit of weather wisdom, you can transform your forest photography from simple documentation into evocative storytelling.
Haze Spray vs. Nature: Can You Fake Atmosphere in Studio Landscapes?
The allure of a perfectly hazy scene is so strong that it begs the question: can we create it on demand? For studio photographers, particularly those working with miniatures, still life, or composites, the answer is a qualified yes. Aerosol haze sprays and professional haze machines offer a level of control that nature rarely provides. However, faking atmosphere is a delicate art that requires a deep understanding of how light interacts with particles. Simply spraying a can into the air will result in an unconvincing, cloudy mess.
The fundamental principle, as highlighted by photography expert Andrew Gibson, is that the direction of light is everything. Without the right lighting, your artificial haze will be almost entirely invisible.
Artificial haze is nearly invisible without strong back or side lighting
– Andrew Gibson, Explore Landscape Photography Guide
This is the golden rule. To make artificial haze visible and create a sense of depth, you must backlight it. When light passes through the suspended particles from behind, each particle catches the light and glows, rendering the volume of “air” visible. A strong rim light or a light source placed behind the subject and aimed toward the camera is essential. This technique mimics how the sun makes natural morning mist glow. To enhance the effect, a second, softer fill light from the side can give the haze shape and prevent it from looking like a flat wall of white.
Creating natural-looking layers is the next challenge. This is achieved by controlling the density. You should apply less haze in the foreground and progressively more in the background. Using a small fan to gently waft the haze can prevent it from settling in uniform clouds and instead create more organic, wispy patterns. The key is subtlety and layering. Wait a minute after spraying for the particles to disperse and settle, which creates a more believable effect than shooting into a fresh, thick cloud.
Ultimately, while artificial haze is a fantastic tool for controlled environments, it’s a poor substitute for the complexity and scale of nature. It excels in creating mood for smaller scenes but can never fully replicate the grandeur of a mountain valley filled with morning fog. It’s an artist’s tool, not a replacement for the real thing.
The Exposure Error That Turns Hazy Scenes into Grey Mush
One of the most common frustrations in photographing haze is returning home to find your images are a flat, muddy grey. The delicate, luminous quality you saw with your own eyes has been replaced by a dull, low-contrast file with noisy shadows. This isn’t a failure of the atmosphere; it’s a fundamental exposure error. Your camera’s light meter is easily fooled by bright, hazy scenes. It sees all that brightness and, in its attempt to render an average “middle grey,” it significantly underexposes the shot. This is the cardinal sin of haze photography.
When you underexpose, you starve the sensor of light and information, particularly in the shadow and mid-tone areas where the delicate details of the haze reside. To “fix” this in post-processing, you’re forced to aggressively push the exposure and shadow sliders. This act of “pushing” the file amplifies the digital noise that was lurking in the underexposed areas, turning smooth gradations into a gritty, unpleasant texture. It’s a common mistake for those who rely too heavily on the Dehaze slider, which can require pushing the Dehaze slider by +30 to +50, often introducing unacceptable levels of digital noise.
The solution is a technique called “Exposing to the Right” (ETTR). Instead of trusting your meter, you must intentionally overexpose the image without “clipping” or blowing out the brightest highlights. Use your camera’s histogram display. A proper ETTR exposure will show the data on the histogram bunched up toward the right side, but not climbing up the right-hand wall. This ensures the sensor captures the maximum amount of light and tonal information. In post-processing, you will then reduce the exposure back to a normal level. This “pulling” process results in a much cleaner, richer file with smooth tones and minimal noise.
Ralph Nordstrom’s Atmospheric Haze Processing Technique
Award-winning landscape photographer Ralph Nordstrom demonstrates how proper exposure and post-processing can transform hazy scenes. In his Death Valley case study, he shows how the foreground maintains clarity while the background appears hazy. By analyzing RGB values, he identifies that background shadows are bluish. His technique involves using Hue/Saturation adjustment layers to manage these colors, leveraging the principle that warm colors advance while cool colors retreat, effectively preventing the ‘grey mush’ effect and enhancing the sense of depth.
This approach requires patience and a deliberate workflow, but it is the only way to preserve the delicate, luminous quality of atmospheric haze. Protect your tones in-camera, and you will be rewarded with clean, malleable files that can be edited to fully realize your artistic vision.
When to Start Shooting as the Fog Lifts for Dramatic Beams?
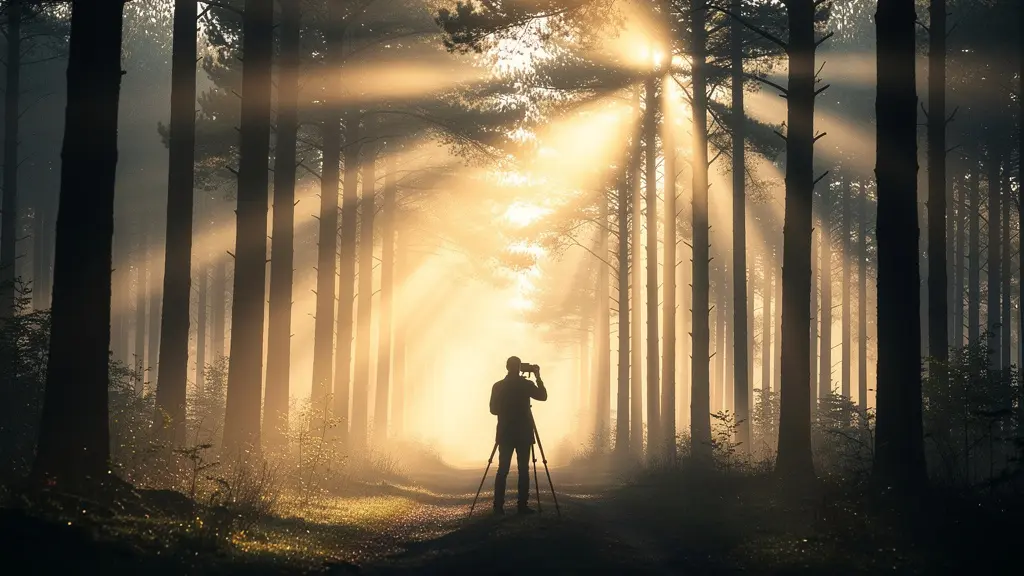
Capturing those breathtaking, god-like beams of light, known as crepuscular rays, is a holy grail for many landscape photographers. These moments are incredibly fleeting and depend on a perfect alignment of sun, atmosphere, and obstructions. It’s not enough to be in a foggy forest at sunrise; you must be ready to shoot in the specific, narrow window when the magic happens. Start too early, and the fog is too thick to be penetrated. Start too late, and the fog has dissipated, taking the beams with it.
The key moment occurs as the fog begins to lift or break apart. The fog needs to be translucent, not opaque. It must be thin enough for the sun’s light to pass through but thick enough for its particles to catch that light and make the beams visible. According to photographer Andrea Livieri’s detailed documentation of twilight transitions, this often coincides with the “Belt of Venus” effect during the transition from blue to golden hour. His work shows that the best dramatic beams occur in the 10-minute window when the fog starts to thin just as the sun crosses the horizon.
Your positioning is critical. You must place yourself so that the sun is behind an obstruction—typically a line of trees or a mountain ridge. These obstructions are what create the distinct shadows and beams. A telephoto lens (100-200mm) is your best friend here. It compresses the scene, making the light rays appear more compact, dense, and dramatic. To expose correctly, use spot metering and take a reading from a sunlit area of the fog itself, not the bright sun or the dark trees. This preserves the brightness of the beams without blowing out the highlights of the entire scene.
As you can see, the result is pure drama. The adventure lies in anticipating the movement. Watch how the fog ebbs and flows in currents. Like reading a river, you can learn to predict where the thinning will occur and where the beams are most likely to appear next. Be ready to move and recompose quickly.
This is the moment all the early morning preparation pays off. It’s a high-stakes, fast-paced challenge, but when you nail the shot, the resulting image carries a sense of magic and awe that few other natural phenomena can match.
Why Does Heat Haze Ruin Your 400mm Landscape Shots?
You’ve framed the perfect long-distance landscape shot with your powerful 400mm telephoto lens. The composition is flawless, the light is beautiful, but the image is inexplicably soft and wavy, as if you were shooting through water. This frustrating phenomenon is heat haze, a common enemy of telephoto photographers. It’s caused by thermal turbulence in the air, especially near the ground on a warm day. As the sun heats a surface like asphalt, rock, or even open fields, that surface radiates heat, creating pockets and columns of rising warm air. Because warm air is less dense than cool air, it has a different refractive index. You’re essentially shooting through thousands of tiny, shifting, invisible lenses, and this turbulence distorts the light on its way to your sensor.
The technical term for this effect adds a layer of scientific understanding, helping to frame it not as a simple flaw but as a specific physical event.
The more common term is ‘atmospheric scintillation’ and it is mostly applied to astronomy
– DPReview Forum Expert, Digital Photography Review Forum Discussion
This is the same reason stars appear to twinkle at night. The effect is magnified exponentially by telephoto lenses because they are capturing a scene through a much longer column of air. What might be unnoticeable with a wide-angle lens becomes a deal-breaker at 400mm or beyond. It’s a battle against physics, but one you can win with strategy. The primary strategy is avoidance. Shoot early in the morning, before 9 AM, before the sun has had a chance to significantly heat the ground. The air is most stable just after sunrise. Shooting after a rainfall can also be effective, as the ground is cool and the air temperature is more uniform.
If you must shoot in the middle of the day, change your position. Gaining elevation and shooting downwards can help you avoid the worst of the ground-level turbulence. Another technique, borrowed from astrophotography, is “lucky imaging.” Use a fast burst mode to capture a sequence of 10-20 shots. In the fractions of a second between atmospheric fluctuations, you might capture one or two frames that are significantly sharper than the others. While it won’t eliminate the haze completely, it can provide a much more usable starting point for your image.
Ultimately, heat haze is a reminder that the air is never truly empty. It is a fluid, dynamic medium. By understanding its behavior, the patient photographer can work with it—or around it—to ensure the sharpness and clarity their vision demands.
Why Does Backlighting Create Immediate Separation from the Background?
Backlighting is arguably the single most important technique for transforming atmospheric haze from a flat, obscuring veil into a dynamic tool for creating depth. When a scene is front-lit (with the sun behind you), haze simply desaturates the scene and reduces contrast, which is often undesirable. But when you turn around and shoot into the light, a remarkable transformation occurs. The haze itself becomes a source of light.
This works because every particle of dust and moisture suspended in the air catches the light from behind and scatters it, causing it to glow. The haze becomes an additive element of light rather than a subtractive one that blocks detail. This glow is what creates visual separation between the layers of your landscape. Distant mountain ranges, which might otherwise blend together, become distinct silhouettes against a brighter, glowing background. This is most effective when the sun is low, as the golden hour occurs when the sun is 0-6° above the horizon, a window of opportunity when the angle of light is perfect for this effect.
This technique essentially borrows a classic studio lighting principle—the rim light—and applies it on a grand, natural scale. The light coming from behind your subject outlines its edges with a bright line, physically separating it from the background. Our visual system is hardwired to notice these high-contrast edges, immediately interpreting the scene as having more depth. A backlit tree is no longer just a dark shape against a hazy background; it’s a defined object with a glowing aura that pops it out of the scene.
Backlighting Techniques in Hazy Conditions
ProGrade Digital’s guide on landscape photography explains how backlighting turns haze into a creative asset. When backlit, atmospheric particles glow, making layers visibly distinct. The technique works because haze adds volumes of light that create depth, rather than obscuring detail. The guide suggests placing sharp foreground subjects against the glowing, diffused background. This rim light effect, borrowed from studio portraiture, creates a powerful separation between subject and background that our eyes are hardwired to notice.
The key to mastering this is to find a strong foreground or midground subject to act as a focal point. A gnarled tree, a dramatic rock formation, or even a person’s silhouette will be perfectly defined against the luminous, atmospheric backdrop. This interplay between dark subject and bright background is the essence of creating dramatic, layered, and three-dimensional landscape photographs.
Key takeaways
- Haze is sculpted by light: Backlighting is the most critical technique to make atmospheric particles glow and create visible layers of depth.
- Timing is everything: The cool, receding tones of blue hour and the fleeting moments when fog lifts to create light beams offer unique and powerful compositional opportunities.
- Control your exposure: Always “expose to the right” (ETTR) in hazy conditions to capture maximum tonal information and avoid turning delicate atmosphere into a flat, noisy grey mush.
How to Choose the Right Diffusion Filter for Cinematic Halation?
After mastering natural conditions, the adventurous photographer can add one final layer of artistic control: the diffusion filter. These filters, once the secret of Hollywood cinematographers, are physical pieces of glass that screw onto your lens to create a soft, glowing effect around light sources, known as halation. While post-processing can mimic this, a physical filter creates a much more organic and pleasing look by physically scattering the light before it ever hits the sensor. It’s the final brushstroke to perfect a hazy, atmospheric scene.
Choosing the right filter depends entirely on the mood you wish to create. They are not all the same; each type has a unique character. A Black Pro-Mist filter, for example, is famous for lifting shadows and creating a soft, blooming glow around highlights, giving a romantic or dreamy feel. In contrast, a CineBloom filter is designed to produce a more organic, film-like bloom. These filters come in various strengths (e.g., 1/8, 1/4, 1/2), allowing you to dial in the intensity of the effect. A lower strength like 1/8 provides a subtle softness, while a 1/2 strength creates a much more pronounced, stylized glow.
The effect of a filter’s strength is also dependent on your focal length. A 1/4 strength filter will have a much stronger and more obvious effect on a wide 24mm lens than on a 200mm telephoto lens, where the effect will be more subtle. It’s crucial to test your filters with your specific lenses to understand how they will behave. For landscape work, it’s often best to start with the lowest strengths (like 1/8 or 5%) to add a subtle cinematic quality without overwhelming the scene. The goal is to enhance the natural atmosphere, not to create a cheesy, overly soft-focus effect.
This table compares some popular options and their characteristics, helping you select the right tool for your vision.
| Filter Type | Effect Character | Strength Options | Best Use Case |
|---|---|---|---|
| Black Pro-Mist | Lifts shadows, blooms highlights | 1/8, 1/4, 1/2 | Romantic, dreamy mood |
| Glimmerglass | Subtle silver sheen | 1, 2, 3 | Glamour, ethereal portraits |
| CineBloom | Organic bloom, film-like | 5%, 10%, 20% | Cinematic landscapes |
| Pearlescent | Smooth skin, soft contrast | 1/4, 1/2, 1 | Beauty, fashion work |
Using a diffusion filter is a deliberate artistic choice. It’s a statement that you are not just documenting a scene, but interpreting it. By adding that soft halation to a backlit sunrise or a misty forest, you are leaning into the mood and enhancing the feeling of being there, transforming your photograph from a simple record into a truly cinematic experience.