The secret to beautiful soft focus isn’t making your image blurry; it’s layering controlled softness onto a foundation of critical sharpness.
- True optical softness comes from sculpting light with filters or vintage lenses, creating a “glow” that digital blur cannot replicate.
- Every successful soft-focus image relies on a “sharpness anchor”—a point of perfect focus (like the eyes) that tells the brain the effect is intentional.
Recommendation: Instead of using a blur slider in post-production, start by mastering one diffusion filter or a single vintage lens to understand how it physically manipulates light.
There’s a particular kind of heartbreak familiar to many photographers. You envision a portrait bathed in a gentle, romantic haze, a dreamy landscape shrouded in atmospheric mist. You take the shot, but on screen, the magic isn’t there. Instead of ethereal, it’s just… out of focus. That beautiful, deliberate blur you were aiming for has become an amateurish mistake. The common advice is often to blame: shoot with a wide aperture, smudge some Vaseline on a filter, or just drag a “clarity” slider to the left in post-production. But these are crude tools that miss the point entirely.
The quest for authentic soft focus is not a subtractive process of removing detail. It is an additive one. It’s not about blurring pixels; it’s about sculpting light before it ever touches your sensor. The true masters of this art understand a fundamental principle that separates intentional artistry from a simple technical error: the sharpness anchor. The most beautiful soft-focus images are not soft everywhere. They are built upon a foundation of critical, undeniable sharpness in one key place, which then allows a whisper of softness to bloom around it. This is the difference between a mistake and a masterpiece.
This guide moves beyond the platitudes. We will explore the physics of optical softness versus the failure of digital blur. We will delve into the specific tools—from vintage lenses to modern diffusion filters—that allow you to control halation and glow. Most importantly, we will establish the non-negotiable rules of focus and depth that ensure your images read as poetic and intentional, not as a missed shot. Prepare to transform your understanding of what it means to create a truly dreamy image.
To guide you through this artistic journey, this article is structured to build your expertise from the ground up. The following summary outlines the key techniques and principles we will explore to help you master this delicate craft.
Summary: The Art and Science of Intentional Soft Focus
- Why Does Post-Processing Blur Fail to Mimic Optical Softness?
- How to Choose the Right Diffusion Filter for Cinematic Halation?
- Vintage Glass vs. Modern Filters: Which Yields the Best Dream Look?
- The Focusing Mistake That Renders the Subject Unrecognizable
- How to Balance Depth of Field with Softness for Portraits?
- How to Replicate the Gum Bichromate Look Digitally?
- How to Create DIY Lens Effects with Household Objects?
- Haze Spray vs. Nature: Can You Fake Atmosphere in Studio Landscapes?
Why Does Post-Processing Blur Fail to Mimic Optical Softness?
The most common pitfall in chasing a soft-focus look is defaulting to a Gaussian blur or a negative clarity slider in software. While convenient, this approach fundamentally misunderstands what creates that coveted dreamy glow. Digital blur is a mathematical process that uniformly degrades pixel information, averaging the values of neighboring pixels. The result is a flat, uninspired softness that often looks mushy and destroys the micro-contrast that gives an image life. It’s a blanket effect that feels artificial because it is.
In contrast, true optical softness is a physical phenomenon of light. It’s born from light scattering as it passes through a diffusion filter, an uncoated vintage lens, or even atmospheric haze. This scattering creates halation, a gentle glow that blooms specifically from the brightest parts of the image—the highlights. It doesn’t uniformly soften everything; it adds a layer of light. A detailed analysis comparing digital simulations to real film found that authentic halation creates reddish-orange halos as light scatters within the film’s physical layers, an organic effect that even advanced software struggles to mimic perfectly.
While no digital effect can perfectly replace an optical one, you can achieve a more convincing result by mimicking the process. This involves isolating only the brightest highlights of your image and applying a controlled blur just to that layer, blending it back over the sharp, untouched original. This technique preserves the crucial micro-contrast and structure of the underlying image while adding a luminous glow where it would naturally occur, creating a far more authentic and pleasing softness than a simple, destructive blur.
How to Choose the Right Diffusion Filter for Cinematic Halation?
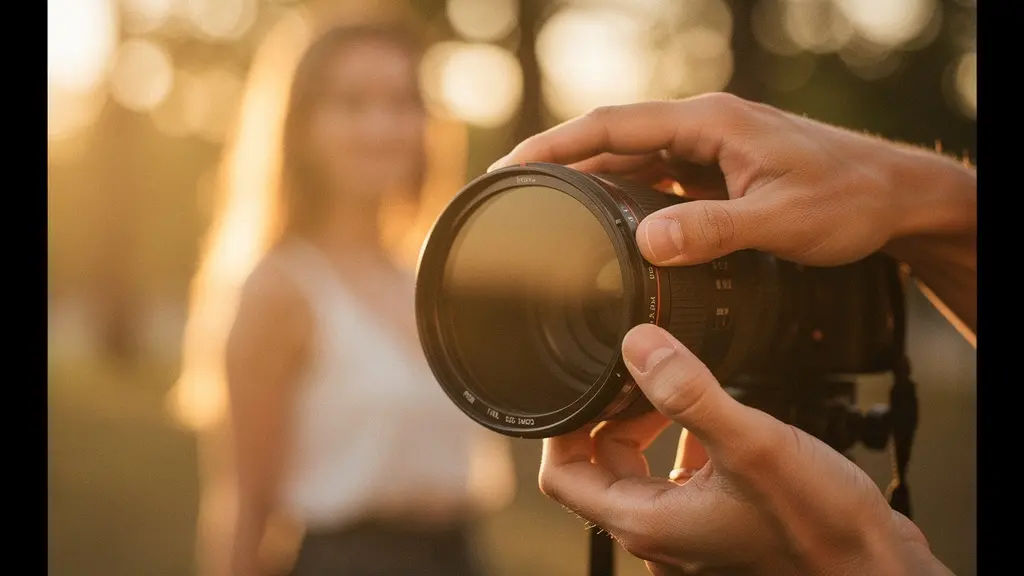
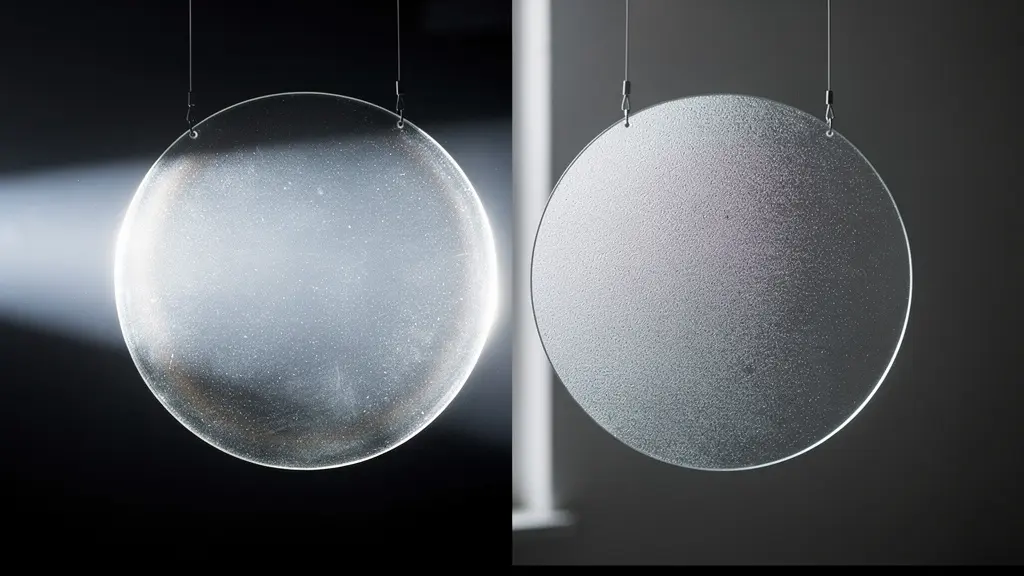
Stepping into the world of optical filters is the first real step toward mastering intentional softness. Unlike digital effects, diffusion filters physically alter the light path, creating authentic halation and a gentle roll-off in contrast. However, “diffusion filter” is a broad term, and choosing the right one is less a technical decision than an emotional one. Each filter family has a unique personality and imparts a distinct mood to the image.
The key is to match the filter’s characteristics to the story you want to tell. Are you shooting a gritty, noir-inspired street scene? A filter that preserves contrast while adding a subtle glow to streetlights, like a Black Pro-Mist, is your ally. Are you aiming for a nostalgic, dreamy portrait? A Glimmerglass filter, known for its ability to soften skin tones with minimal highlight bloom, would be a more appropriate choice. It’s about developing a palette. The filter is not just a tool; it’s a brushstroke that defines the emotional tone of your work. This visual guide demonstrates how a filter interacts with light, turning a harsh point source into a blooming, ethereal glow.
Understanding these nuances is what elevates a photographer’s work. Instead of applying a generic “soft” look, you begin to make deliberate choices about the quality of the halation. Do you want a warm, golden glow for a sunset scene, or a classic Hollywood glamour with pearlescent highlights? The following table, adapted from an analysis of popular diffusion filters, maps common filter types to the moods they help create, serving as a starting point for your creative exploration.
| Filter Type | Emotional Mood | Halation Characteristics | Best Use Case |
|---|---|---|---|
| Black Pro-Mist 1/4 | Gritty Urban Drama | Subtle glow, maintains contrast | Night cityscapes, street photography |
| Glimmerglass | Nostalgic Dreaminess | Softens skin, minimal highlight bloom | Portrait sessions, beauty shots |
| CineBloom | Ethereal & Magical Glow | Strong halation, rainbow flares | Fantasy scenes, backlit subjects |
| Hollywood Black Magic | Classic Hollywood Glamour | Smooth highlights, vintage feel | Fashion, glamour portraits |
| Golden Mist | Warm Cinematic | Golden halation in highlights | Golden hour, sunset scenes |
Vintage Glass vs. Modern Filters: Which Yields the Best Dream Look?
Another path to optical softness lies in the beautiful imperfections of vintage lenses. Before modern multi-coatings perfected lens design, older glass was prone to flare, lower contrast, and various aberrations—qualities once considered flaws but now celebrated as “character.” A vintage lens doesn’t just soften an image; it imparts a unique signature, from the swirly bokeh of a Helios 44-2 to the painterly glow of an early Cooke triplet. This approach offers a fundamentally different feel from a modern, clinically sharp lens paired with a diffusion filter.
The distinction is subtle but crucial for an artist. As renowned photographer Andrew Sanderson notes, the two methods produce distinct aesthetics:
Vintage lenses often have a gentle, gradual transition from sharp to unsharp, while modern lenses with filters maintain a crisp focal plane with a distinct ‘glow’ overlaid. This is a key difference in achieving a ‘dreamy’ vs. ‘cinematic’ look.
– Andrew Sanderson, Amateur Photographer Magazine
The vintage lens offers an integrated, holistic softness that feels woven into the image’s fabric. The modern lens with a filter offers a more controlled, layered effect, where a sharp, contemporary image is overlaid with a specific diffusion character. Neither is inherently better; they are simply different artistic choices. The true mastery comes not from choosing one over the other, but from understanding how to combine them. This “character stacking” allows for ultimate control, blending the organic aberrations of old glass with the predictable halation of a modern filter to create a look that is entirely unique.
Your Action Plan: The Character Stacking Technique
- Lens Selection: Choose a vintage lens known for a specific aberration you desire (e.g., Helios 44-2 for its swirly bokeh, or a Jupiter-9 for its soft glow).
- Aperture Control: Set the aperture to a middle ground (f/2.8-f/4). This allows the vintage character to show without the image becoming uncontrollably soft.
- Filter Addition: Add a light-strength (1/8 or 1/4) modern diffusion filter, like a Pro-Mist, to add controlled halation to the highlights.
- Lighting Setup: Position your subject against a backlight. This will maximize both the bokeh from the vintage lens and the halation from the filter.
- Fine-Tuning: Audit the balance by adjusting the aperture. Open it up for more vintage aberration, or stop it down to get a cleaner halation effect from the filter.
The Focusing Mistake That Renders the Subject Unrecognizable
The single most critical mistake that turns a dreamy photo into a blurry mess is the failure to establish a Sharpness Anchor. This is the core principle that underpins all successful soft-focus work. Your image can be awash in glow, flare, and beautiful bokeh, but if there is not one single point of critical, undeniable sharpness for the viewer’s eye to latch onto, the brain will interpret the entire image as a technical error. The soft-focus effect collapses from an artistic choice into a simple mistake.
In portraiture, this anchor is almost invariably the subject’s eyes—or, more specifically, the eye closest to the camera. Analysis of professional cinematography techniques reveals this is a non-negotiable rule. According to an analysis of stylized focus in 100 films, maintaining at least one sharp element is essential for selling the effect. This anchor provides context for the softness, giving it permission to exist. It communicates intent. Without it, the viewer is lost, their brain searching for a focal point that isn’t there.
Even with this principle in mind, common shooting habits can sabotage your efforts. The popular “focus-recompose” technique, where you lock focus on the subject and then move the camera to frame the shot, is notoriously prone to error, especially at wide apertures. A technical analysis found that, in practice, more than 87% of photographers using focus-recompose experience a measurable loss in focus accuracy. This slight shift is often all it takes to move the plane of perfect sharpness from the subject’s eyelashes to their earlobe, destroying the anchor and compromising the entire image. Using a flexible spot focus point directly over the eye is a far more reliable method for nailing that critical sharpness.
How to Balance Depth of Field with Softness for Portraits?
A common instinct for creating a “dreamy” portrait is to combine the two most obvious “softening” tools: a very wide aperture (like f/1.4) and a strong diffusion filter. The logic seems sound—more softness from both should equal a dreamier look. In reality, this often leads to a disastrous, mushy image where all structure, detail, and form are obliterated. The effects don’t just add up; they multiply, often canceling each other out in a haze of indistinct blur. The art lies not in maximizing softness, but in balancing it with structure.
This is where a counter-intuitive piece of advice from master cinematographers becomes invaluable. As the celebrated Director of Photography Bruno Delbonnel explains, sometimes adding sharpness back into the lens actually enhances the filter’s effect.
When shooting wide open with a strong diffusion filter, the combined effect can obliterate all detail. Stopping down the lens by one or two stops can actually enhance the soft-focus effect by reintroducing just enough structure for the diffusion to work against.
– Bruno Delbonnel, In Depth Cine Interview
This is a crucial insight. The diffusion filter’s halation needs highlights and edges to react against. By stopping your lens down from f/1.4 to f/2.8 or even f/4, you increase the depth of field slightly. This brings back a subtle structure and definition to the face—the line of a jaw, the shape of the lips. This re-introduced sharpness doesn’t fight the filter; it gives it a canvas to paint on. The glow from the filter now has a defined edge to bleed from, making the effect more visible and more beautiful. The final image perfectly balances a sharp foundational structure with a luminous layer of softness.
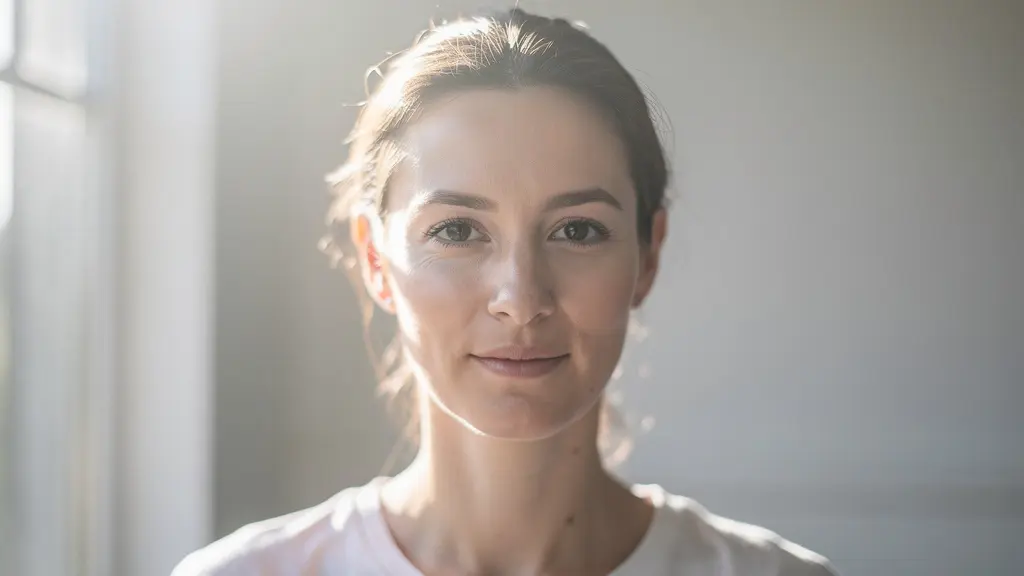
This portrait demonstrates the ideal balance. The eyes are critically sharp, serving as the anchor, while the depth of field is shallow enough to soften the ears and background. The diffusion creates a gentle halation in the hair highlights without destroying the texture.
How to Replicate the Gum Bichromate Look Digitally?
The desire for a soft, painterly aesthetic is not new. It’s a direct lineage from the Pictorialist movement of the late 19th and early 20th centuries. Photographers of that era, using techniques like gum bichromate printing, intentionally moved away from the sharp, documentary nature of the medium. Their goal was to elevate photography to the level of painting by introducing texture, softness, and a visible artist’s hand. As an analysis from the Edward Steichen Archives notes, understanding this “why” is key for any modern artist trying to replicate the look digitally; it’s about making choices that serve the goal of a painterly, not just a blurry, image.
Recreating the gum bichromate look is not about a single filter or action; it’s a multi-layered process that mimics the physical components of the original medium. It’s about reducing overall sharpness while introducing organic texture and color artifacts. The core of the technique lies in separating micro-contrast from overall image structure. You want to soften the fine, photographic details without losing the larger shapes and forms. This is often achieved by using negative clarity or texture settings, which can reduce that crisp digital look.
The next step is to reintroduce the “paper” element. A physical gum print was an emulsion painted onto watercolor paper, and its texture was integral to the final piece. Digitally, this can be simulated using displacement maps based on paper textures, which subtly distort the image to follow the paper’s grain. Finally, the characteristic color bleeding and uneven edges of the print can be mimicked using filters and layer masks to create a more organic, less perfect frame. Following a structured workflow allows you to build these layers controllably for a consistent and authentic result.
- Start by applying negative clarity (-30 to -50) in your editing software to reduce the harshness of digital micro-contrast.
- Use a watercolor paper texture to create a Displacement Map (in Photoshop: Filter > Distort > Displace) to impress the paper’s grain onto your image.
- Apply a Gradient Map adjustment layer with a duotone or tritone palette (such as sepia or cyanotype) to replicate the chemical coloring.
- Use a Spatter filter on a layer mask to create painterly, uneven edges, mimicking how the emulsion would bleed.
- Finally, add a layer of subtle grain to unify the image and complete the illusion of a textured, physical object.
How to Create DIY Lens Effects with Household Objects?
While professional diffusion filters offer consistency and control, there’s an undeniable magic and creative freedom in experimenting with DIY lens effects. The age-old trick of smearing Vaseline on a UV filter or shooting through a nylon stocking are not just budget alternatives; they are entry points into understanding how physical objects in front of your lens manipulate light. The key to elevating these techniques from a gimmick to a tool is one word: control. Instead of randomly applying an effect, a modern photographer should approach it with intent.
For example, don’t just smear Vaseline on a filter. Apply it in a radial pattern from the center outwards to create directional flares. Leave the center of the filter completely clean to preserve your “sharpness anchor” while surrounding it with a dreamy haze. With a nylon stocking, don’t just pull it tight. Vary the tension to control the intensity of the softening, or use a double layer for a stronger effect. A crinkled plastic bag held to the edge of the lens will create sharp, unpredictable flares, while stretching it smooth will produce a softer, more uniform haze. Each variation is a different brush in your toolkit.
You might be surprised at how effective these simple tools can be, even when compared to expensive professional gear. The quality of the effect is often more dependent on the quality of light than the cost of the filter.
DIY Hairspray Filter vs. Professional Pro-Mist
To test the viability of DIY solutions, a professional comparison was made between a commercial Tiffen Black Pro-Mist 1/2 filter (costing $80) and a simple DIY alternative: a clear UV filter lightly sprayed with hairspray (costing $5). The results were remarkable. An analysis published on Zoner shows that in backlit conditions, the DIY hairspray filter produced virtually identical halation effects and softness levels to its professional counterpart. The study’s key finding was that the lighting was the most critical factor; backlight produced three times stronger halation than front light, regardless of whether the filter was a high-end commercial product or a homemade one.
Key takeaways
- True soft focus is an additive process: you layer controlled softness onto a foundation of critical sharpness, not the other way around.
- Every successful soft-focus image relies on a “Sharpness Anchor”—a point of perfect focus, usually the eyes, that gives context to the surrounding softness.
- Optical effects from filters and vintage lenses create authentic halation (a glow from highlights) that is physically different and superior to generic digital blur.
Haze Spray vs. Nature: Can You Fake Atmosphere in Studio Landscapes?
Creating a sense of depth and atmosphere is fundamental to landscape photography, but what happens when nature doesn’t provide the perfect morning mist? The go-to solution is often an aerosol can of “haze” or a fog machine. However, photographers quickly discover that a single blast of spray in a studio rarely looks like real atmospheric haze. It often appears as a flat, uniform curtain of smoke, failing to create the illusion of distance. The problem is a misunderstanding of how natural haze works.
Real atmospheric haze creates volumetric depth. Light scatters off particles (like water or dust) throughout the entire volume of a scene. This means objects farther away are viewed through more particles, making them progressively lighter and lower in contrast. A single puff from a haze can can’t replicate this. The solution, as discovered in professional studio tests, is layering. Instead of one dense cloud, you apply multiple, light layers of haze, placing scenic elements at different distances within these layers. According to a study on creating atmosphere, an 85% similarity to natural conditions was achieved by using 3-5 layered applications of haze combined with strong backlighting to make the volumetric shadows “pop.”
Choosing the right tool for the job is also critical. Not all artificial haze is created equal. The size of the particles and the density of the aerosol determine the look and duration of the effect. A fine “haze in a can” is perfect for simulating distant mountain haze, while a dense, water-based fog machine is better for creating low-lying morning mist. The table below outlines the characteristics of common aerosol types, helping you make a more informed choice for your specific atmospheric needs.
| Aerosol Type | Particle Size | Best For | Duration |
|---|---|---|---|
| Haze in a Can | Fine, airborne | Light diffusion, distant mountain haze | 5-10 minutes |
| Fog Machine | Dense, water-based | Thick morning mist, low-lying effects | 2-5 minutes |
| Atmosphere Aerosol | Ultra-fine | Subtle room atmosphere, light beams | 10-15 minutes |
| Cracker Smoke | Medium density | Dramatic smoke effects, fire scenes | 30-60 seconds |
Now, take these principles, pick up your camera, and start experimenting. The path to creating your own dreamlike, evocative images begins not with a new piece of gear, but with a new way of seeing and a commitment to intentional, controlled artistry. Your first truly masterful soft-focus shot awaits.